
Thursday, October 14, 2010
Week 7 - Jewelry 3 - Half-way through the Week, So much to Update
It's only Thursday, and I feel like I haven't blogged in forever. I have so much to show, but for now, this is all you get.


Week 7 - Design and Production- Writing Assignment Part 2
I have been holding off on this part of my writing assignment because I don't really know what to say....but, here goes nothing.
PART TWO : Your Personal Approach to Your Work
A. What inspires you to create? Is it the materials you use? The places you see and visit? The people you know and meet? Your emotional state? Other artists’ work? The mark you make on the page? Form specific ideas about the act of making art, not generalized phrases that appear in so many statements
What inspires me to create is an urge to do it. There is no way to describe this, its just something in me that says you need to "make something" and I get the idea for what it is in my head and then every inch of my being feels the need to carry through with it. I am inspired be other artists who do good work, I sometimes feel that I could do what they did or I could do what they did in a better or new way. If something is particularly good I feel the need to do something to prove I am that good as well. I have this very competitive drive in creating art. I want to be the best and have the best work I can.
B. How has your art evolved in the 5 years? 1 year? 6 months? Pick those that are appropriate to the length of your career and write about them. What has stayed the same? What are common threads? What has changed a little? What has changed dramatically? How have you felt about your art along the way?
I guess it has really be 1 year in metalsmithing and object design but I honestly feel like this is the first time I am creating work. I want everything I create to not be "a school project", I want it to have a deeper emotional meaning to me so that the work is that much stronger. I want to do every thing I can do in a piece and I like to overextend my skill to see if I can handle it. I have been creating art since I was a child and I guess I have had professional training for about 6 years now. My work has always had a social criticism and a playful aspect that I want to retain, but it also shows my hand. Nothing is ever "perfect" looking, it has a look of humanity.
C. Describe the process of thinking about your work and how it comes together in your mind. Do not describe the actual making of the work. How do you begin an artwork? What inspires you to start it? Then, what is the first step? Is it a drawing? a photograph? a single mark?
I try to think about WHY I am creating the work and then I take that and see how far I can take it. I start to draw it out and I make charts and webs of the topic to refine the work. Then I just go at it and start to make tons of sketches and maquettes of the sketches to try and figure it out. I then start to work on it and if the material demands that I am unable to do this then I will go back and redesign and rethink. Sometimes what I design is not possible and I only find it out by doing it. Then I will make multiple versions to see which comes out the best and mix and match different elements so that everything comes out to be the best of every element I can do.
D. How do you physically go about putting a work of art together? What are the steps that are involved? Is this a process understood by the majority of people? Or would it be helpful for you to define it somehow? If so, try to find the words. Do you approach a traditional medium in a unique way?
I change it up a little bit every time. I really do a mix and match sort of thing where I will make multiples of each element and then go back and redesign the "final" version in order to make it the best of every other part of every sample I have made. I approach all mediums about the same way which is the interesting part. I will make different elements and features even in drawings I like to take pieces and trace them and move them or even physically stitch them together.
E. Thinking back and looking back on what you have written so far this week, select the points that you feel are most relevant and unique about how you work.
I think that part that is the most unique really is the way I mix and match elements.
Friday, October 8, 2010
Week 6- Recap
J3-
 I would like to announce to the world, I have made a hinge. Okay, it's really nothing to write home about, but its something and I am proud of it. I worked on my remedial filing today as well and its getting better. I just need to keep at it.
 I need to work on filing my chamfers and my soldier usage. I am going to make a few more on my test piece for my container so, it should be quite nice.
  I also finalized a lot of the design after a long talk with Katja today. That is something I really love about Towson. They have an amazing grad program with super helpful, super informed grad students that are easy to talk with and really help you sort out what you are thinking. I'm really appreciative for their time and efforts. They really bring a lot to the table every day. But, back to what I was saying, I figured out that specific details with my hinge after talking to her that I think really will work. It means a little more work for me, but the results should be amazingly better.
  I want to knock out the etching and the practice hinge on the sample this weekend for sure. I have all day tomorrow to cut and file before work and Saturday afternoon to make the hinge giving me Sunday after work to cut out the face plates and prepare it for soldering Monday. During all this I can work at the same time etching and practicing the finishing of the surface. It should be really nice. I realized I have to make this sample perfectly anyway because I needed something to stretch the gut over. If I do it on the actual piece I will pull off any finishing I do and get the texture of the etching which is not what I think I am going for. I will do some tests after I make a few samples this weekend.
 I would like to announce to the world, I have made a hinge. Okay, it's really nothing to write home about, but its something and I am proud of it. I worked on my remedial filing today as well and its getting better. I just need to keep at it.
 I need to work on filing my chamfers and my soldier usage. I am going to make a few more on my test piece for my container so, it should be quite nice.
  I also finalized a lot of the design after a long talk with Katja today. That is something I really love about Towson. They have an amazing grad program with super helpful, super informed grad students that are easy to talk with and really help you sort out what you are thinking. I'm really appreciative for their time and efforts. They really bring a lot to the table every day. But, back to what I was saying, I figured out that specific details with my hinge after talking to her that I think really will work. It means a little more work for me, but the results should be amazingly better.
 I made a timeline that if I follow perfectly will allow me about 4 days to really clean it up and finish it up. I want the actual etching and forming done by Monday night or Tuesday afternoon by the latest giving me time to make the internal framing and hinges this week. This will only leave the attachment of the hinge and the final details like the gesso and colored pencil finishing (which reminds me to throw some scrap pieces to be etched to get some practice in on that before its show time).
 I want to knock out the etching and the practice hinge on the sample this weekend for sure. I have all day tomorrow to cut and file before work and Saturday afternoon to make the hinge giving me Sunday after work to cut out the face plates and prepare it for soldering Monday. During all this I can work at the same time etching and practicing the finishing of the surface. It should be really nice. I realized I have to make this sample perfectly anyway because I needed something to stretch the gut over. If I do it on the actual piece I will pull off any finishing I do and get the texture of the etching which is not what I think I am going for. I will do some tests after I make a few samples this weekend.
 D & P-
Really on track at the moment with this. Not much to report this week, really working on my rhino models and I hope to post up some screen captures later this weekend. I want to get a few different forms and play with the scale of them to get them rapid prototyped and then finished. I will go into more detail about this as it goes on. I am waiting on some samples to arrive back first before I move any further.
Wednesday, October 6, 2010
Week 6- Jewelry 3- Hinge Sample Failures and Die Forming Sucesses
Its been a long day, roughly 16 hours between the studio at school and the makeshift studio I set up at my house. My hands are almost too tired to type, but I learned so much today, I feel totally different then I did this morning. I don't know where to start, the good, the not so good, or the totally ugly. I think I will start with the ugly.
So, I went to soldier my first hinge, Guess what, the knuckles were completely crooked because the pin was too loose. I took it out. So ends attempt number 1 with me heating and removing the knuckles from the sheet.
Attempt number 2, the soldiering goes much better. Everything it tacked in place and its beautiful right? WRONG, the knuckles were too small and thus a very flimsy hinge was created. So ends Attempt 2, with me removing the two hinges from the right side.
Attempt 3, showed more promise. I cut two knuckles to fill the gaps, I tacked them down....it was wonderful right? WRONG! Apparently the entire time that top knuckle was throwing the rest of them off. So I removed all the knuckles and went back to the drawing board with the intention of re-filing the groove and placing the knuckles back on the plates. I removed the knuckles, began to file and noticed it was no longer really square. So ends Attempt #3 with it completely in pieces in a little bag.
Attempt #4, Okay, this time I'm Going to do it RIGHT! This is my current attempt and I think according to a quote given out during the demo for hinge making, I have 1 more if I really want to learn how to do it. And, I am sure I will get there. Thanks to John Shea, I learned how to properly file today. Okay, wait let me bold that, I learned how to properly file today! This is a major deal for me. Anyway, I filed the 45 with no problems, filed in the groove and got the brilliant idea to make a template for measuring in rhino so I merely had to line up my dividers to the exact measurements. I even made one for cutting the tubing with a cut guideline so allow for filing flat and filing in the chamfer.
Attempts Completed: 3
For Tomorrow:
- Draw Down Tubing again, ran out/I want to make it slightly smaller
- Cut Tubing
- Soldier in Place
I think I have corrected a lot of the mistakes I made the first few times. The groove needs to be perfect, the pin needs to be super tight, and if its not working don't try to make it work just restart it. Also, doing all this showed me exactly how I will have to do it on my actual project so that's the better news.
BUT that's not all I did today.
Last night, I finished cutting out my official die for the project! This morning, I put it all together, filed it nicely and started my pressings. Okay, so the die is not as perfect as I wanted; however, it is doing exactly what I want so as long as its working I don't want to change it.


In all, I am a little concerned about getting the hinge sample done tomorrow, but after work I am headed to the studio for a little while to get the tubing sorted out. As for the project, I think it is at the point now where I can get these plates etched and just knock it out this week and soldier it together next week. I have decided to leave the backing quite simple. It will be lightly formed with the same flat etching on the inside. The back will be a series of ball-headed rivets that "poke" you as you wear it. It serves as a tactical memory.
 |
| Attempt #2 |
Attempt number 2, the soldiering goes much better. Everything it tacked in place and its beautiful right? WRONG, the knuckles were too small and thus a very flimsy hinge was created. So ends Attempt 2, with me removing the two hinges from the right side.
Attempt 3, showed more promise. I cut two knuckles to fill the gaps, I tacked them down....it was wonderful right? WRONG! Apparently the entire time that top knuckle was throwing the rest of them off. So I removed all the knuckles and went back to the drawing board with the intention of re-filing the groove and placing the knuckles back on the plates. I removed the knuckles, began to file and noticed it was no longer really square. So ends Attempt #3 with it completely in pieces in a little bag.
Attempt #4, Okay, this time I'm Going to do it RIGHT! This is my current attempt and I think according to a quote given out during the demo for hinge making, I have 1 more if I really want to learn how to do it. And, I am sure I will get there. Thanks to John Shea, I learned how to properly file today. Okay, wait let me bold that, I learned how to properly file today! This is a major deal for me. Anyway, I filed the 45 with no problems, filed in the groove and got the brilliant idea to make a template for measuring in rhino so I merely had to line up my dividers to the exact measurements. I even made one for cutting the tubing with a cut guideline so allow for filing flat and filing in the chamfer.
Attempts Completed: 3
For Tomorrow:
- Draw Down Tubing again, ran out/I want to make it slightly smaller
- Cut Tubing
- Soldier in Place
I think I have corrected a lot of the mistakes I made the first few times. The groove needs to be perfect, the pin needs to be super tight, and if its not working don't try to make it work just restart it. Also, doing all this showed me exactly how I will have to do it on my actual project so that's the better news.
BUT that's not all I did today.
Last night, I finished cutting out my official die for the project! This morning, I put it all together, filed it nicely and started my pressings. Okay, so the die is not as perfect as I wanted; however, it is doing exactly what I want so as long as its working I don't want to change it.


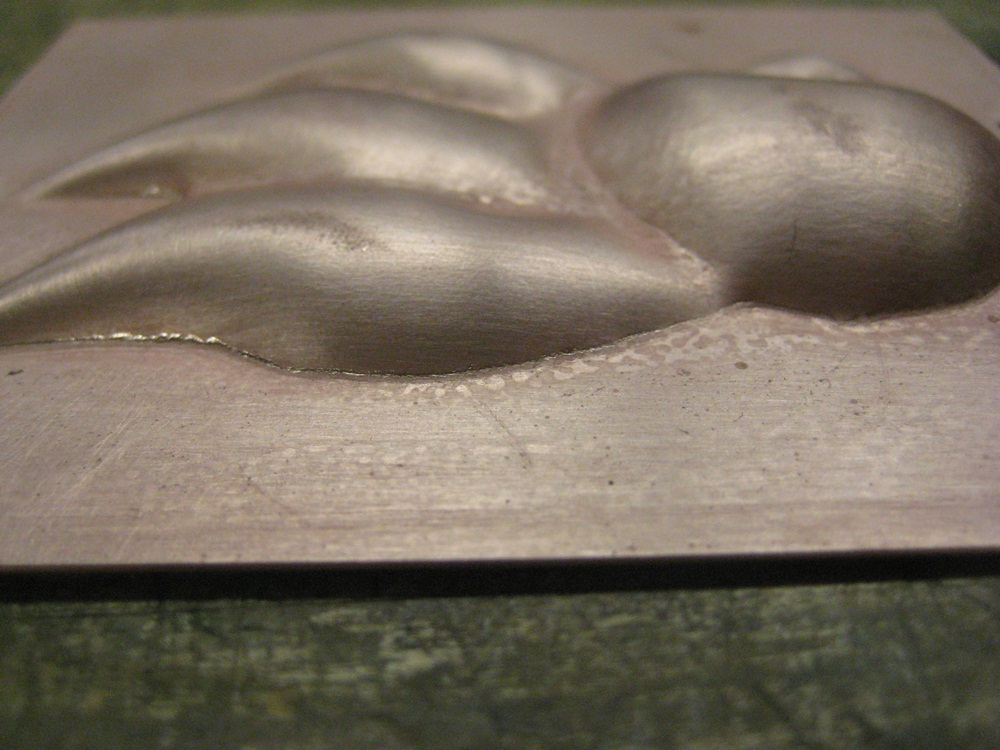
So far, just testing to get the exact pressures right for the actual piece. I also began to draw out the patterns with the resist onto the 18ga copper. I decided to go with 18 because it will be etched on both sides which will thin the metal considerably. I am thinking of testing it with both 18 and 20 ga to see which is the best result. I want to have the same flower pattern on the inside the each part of the outside will be different to show her different personalities.

Tuesday, October 5, 2010
Week 6- Design and Production - "Big Picture Stuff"
Starting to work on my Artist Statement, just some big picture stuff.
A. When do you first remember making art?
I don't remember the first time I started to make art, but I have drawn since I was a child. There really hasn't been a time when I wasn't making art.
- What were the experiences like?
Generally it was a past-time when I had nothing else to do, then I became more and more compelled to do it. I have never found "art" I couldn't make, so it was a constant challenge to keep making art.
- What compelled you to return to art throughout your life?
I have always been in an art program. Since I was a young child, art has been deeply rooted to my education. I have been compelled to stay with art because it is all I know and all I want to do.
- When did you first consider yourself an artist?
When I started at Carver Center for the Arts and Technology in High School. When I was accepted into the program and after my first year I decided this is what I wanted to do for the rest of my life.
B. Experience with Specific Artwork
There are so many different pieces that have influenced me, so I guess its cheating here but, what draws me to all of these is the same. It is the emotion that is gives, not the subject or color, it gives a feeling. There is this moment when you see a good piece of art that captures your attention. It makes your eye follow all its curves and makes you wonder about it. That is what draws me to it. I try to get this quality in my work. I want people to take the deeper look.
C. Influences
I have a few different influences. I love the work of Droog, Mio, Sally Mann, Lucian Freud and Rodin. My tastes vary due to different years in different programs throughout high school and the first two years in college. I think that my recent interests (Droog and Mio) have been really based off the idea of sustainability and the clean look they both have. They have made me want to create clean, modern, sustainable products yet at the same time be true to my own voice and my own ideas. I am also often influenced by the social media artists that share their work on youtube. I think that artists like Juliana Daily who have taken there music to the mass market without a label are the future of the music industry.
D. How does your work relate to art that has been produced in the past?
I like some of the older motifs. I like the idea of the victorian elements simplified like in art nouveau or the arts and crafts movement. I think that some great work can be produced by looking back at what has been done and using it as an influence.
-How does it relate to art that you are seeing in your community, exhibitions, or in art publications? what is similar? what do you consider to be unique to you?
I have not really produced that much work recently. I have really spent most of my time feeling out what I wanted to do. My new work and my new ideas seem to be along some of the work see out there. It is similar in is simplicity and loosely nature based representations. It is different in the way it is shaped and the variations around the similar forms. I think the way I use the shapes and symbols is unique to me.
A. When do you first remember making art?
I don't remember the first time I started to make art, but I have drawn since I was a child. There really hasn't been a time when I wasn't making art.
- What were the experiences like?
Generally it was a past-time when I had nothing else to do, then I became more and more compelled to do it. I have never found "art" I couldn't make, so it was a constant challenge to keep making art.
- What compelled you to return to art throughout your life?
I have always been in an art program. Since I was a young child, art has been deeply rooted to my education. I have been compelled to stay with art because it is all I know and all I want to do.
- When did you first consider yourself an artist?
When I started at Carver Center for the Arts and Technology in High School. When I was accepted into the program and after my first year I decided this is what I wanted to do for the rest of my life.
B. Experience with Specific Artwork
There are so many different pieces that have influenced me, so I guess its cheating here but, what draws me to all of these is the same. It is the emotion that is gives, not the subject or color, it gives a feeling. There is this moment when you see a good piece of art that captures your attention. It makes your eye follow all its curves and makes you wonder about it. That is what draws me to it. I try to get this quality in my work. I want people to take the deeper look.
C. Influences
I have a few different influences. I love the work of Droog, Mio, Sally Mann, Lucian Freud and Rodin. My tastes vary due to different years in different programs throughout high school and the first two years in college. I think that my recent interests (Droog and Mio) have been really based off the idea of sustainability and the clean look they both have. They have made me want to create clean, modern, sustainable products yet at the same time be true to my own voice and my own ideas. I am also often influenced by the social media artists that share their work on youtube. I think that artists like Juliana Daily who have taken there music to the mass market without a label are the future of the music industry.
D. How does your work relate to art that has been produced in the past?
I like some of the older motifs. I like the idea of the victorian elements simplified like in art nouveau or the arts and crafts movement. I think that some great work can be produced by looking back at what has been done and using it as an influence.
-How does it relate to art that you are seeing in your community, exhibitions, or in art publications? what is similar? what do you consider to be unique to you?
I have not really produced that much work recently. I have really spent most of my time feeling out what I wanted to do. My new work and my new ideas seem to be along some of the work see out there. It is similar in is simplicity and loosely nature based representations. It is different in the way it is shaped and the variations around the similar forms. I think the way I use the shapes and symbols is unique to me.
Monday, October 4, 2010
Week 6- Design and Production- Let's Go Digital
 So Today, I made my large bud pendant in Rhino. I made it with a loop on the back and without a loop to see how it looks. They were then sent out to Shapeways to be printed in Black glass and I should see them back roughly October 18th.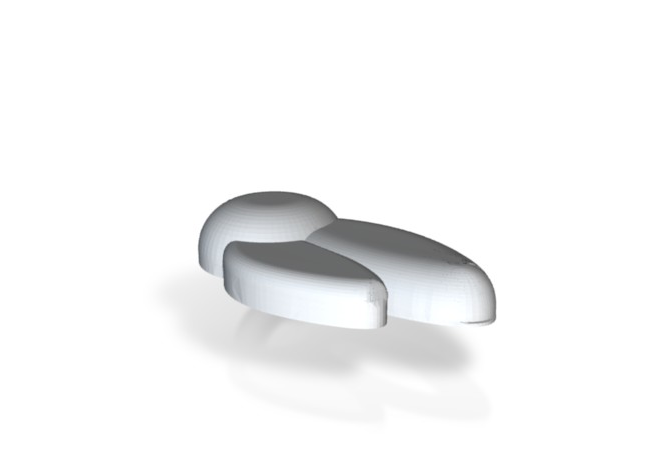
Saturday, October 2, 2010
What Color are your GUTS Part 2!
This is the results of yesterdays dying of gut:


I also experimented with mixing the colors:


I also experimented with mixing the colors:

I am loving the red/yellow and the blue. There is not enough difference in the color of the green for me and for my project I really think that reddish one is where I want to go with it. This is all a single layer of gut put on styrofoam to dry. The Styrofoam gives it this really cool texture that I want to play up in the future. I have also found that it looks the best when it is still attached to the metal and hasn't been pulled off the first time. I did find; however, that you can re-wet the gut and smooth it back over the metal to get a similar effect. I have also found that mod podge sufficiently coats the metal so it does not stick and seems to protect it slightly from the wetness of the gut.
Also, a single layer of gut can be dried in about 5 minutes with a hair dryer on a low setting.
Friday, October 1, 2010
What Color are your GUTS!
So, I have been continuing my experimentation with hog gut this weekend. Today's experiment was dying the gut different colors. 
 blue
blue
 green
green
 orange and red
  Still Wet, 2 layers of Gut
 Dry, just the gut, 2 layers with a finish of modge podge on to
Below: The Gut and the dapped copper bowl I used for the sample.
From here:
1. Going to try a tube rivet, ball headed rivet, and a standard rivet in brass and copper on the first set of gut
2. Going to attempt to find faster ways of drying times (maybe a hair dryer?)
3. Stretch the colored gut.

My process:
1. Rinse salt brine off the gut. This is best done with lukewarm or room temperature water. It softens the gut allowing it to expand slightly. This also removes some of the odor.
2. Put about 1 cup of cold water to about 5 drops of food dye in a pot and put it on low heat.
3. BEFORE THE PAN HEATS UP, place the guts in the water in the pot. At this point, you have to be quick, the water in the pan still needs to be cold! This will allow the gut to begin to soften and begin to absorb the color.
4. Keep stirring constantly, the gut cannot get HOT, it can be warm but not hot. When it is almost to the desired color you wish take the gut from the water. At this point again, the water can not be hot. Under no circumstances should it be allowed to boil or even begin to be close to a boil. This will ruin your gut.
5. Take the gut and open the end placing it around the opening of a faucet. Turn on the water and allow it to fill the casing (like sausage). This is expanding the casing without tearing it, make sure you put the water in slowly or it will rip. This also makes it very soft at this point.
6. Drain water and fill the casing with air. This will allow the dye to get into any recesses that may have been missed before. How you fill it with air is up to you, I'm pretty strong stomached so I pretty much just blow into it keeping it as far away from my face as possibly. It's a pretty funny sight to see, but this stuff has a pretty strong smell before it dries.
7. Return to the pot of color for about 2-4minutes while it is still filled with air, keep it moving so it coats all the sides.
8. Remove from heat. If it is not as dark as you want it, then take the color and the gut and put put it to air cool, it will continue to dye until you remove it from the color.
9. Rinse the gut throughly.
10. Final treatments as before in soaking the gut for about an hour until soft.
Coloring:
 blue
blue green
green orange and red
 Here is the results of the gut that has not be dyed and was allowed to air dry overnight:


Below: The Gut and the dapped copper bowl I used for the sample.

From here:
1. Going to try a tube rivet, ball headed rivet, and a standard rivet in brass and copper on the first set of gut
2. Going to attempt to find faster ways of drying times (maybe a hair dryer?)
3. Stretch the colored gut.
Thursday, September 30, 2010
J3-It's all in the Guts
Prepare for blog spam this weekend, I am working 24/7 in the studio both home and school and will keep you up to date on the latest developments in the projects.
I received my very lovely package from Midway USA of fresh hog gut, fibrous gut, and collagen casting.
 Some initial thoughts upon opening the packaging:
- The Collagen Casings have potential, they are very rigid and paper-like but still very thin
- the Fibrous Casing is very rigid but comes in very large sheets
- the hog gut has a horrid smell and comes in small tangled strands that have to be manually untangled
 Then following some suggestions from my boyfriend who makes sausages and from some previous Towson Students who shared some knowledge, I soaked the gut in hot water. From Matt, I got the recommendation to soak it in hot water for an hour and then change the water to remove the salt base, rinse, and soak again for about 20 minutes. The large tied casing is the Fibrous, the semi see-through mass is the Collagen, and the white dark strand is the natural hog gut.
Some thoughts after the first hour of Soak:
1. Hog gut is very thing and see through, very flexible and seems easy to work with
2. Collagen remains semi stiff but the more it soaks the softer it gets, this product recommends either boiling in water prior to use or soaking for 24 hours or a combination there of so I will follow that recommendation prior to working with it
3. Fibrous is very stiff even after an hour of soaking, they recommend soaking for 24 hours changing water often as well as boiling if still remains stiff
I will stretch these one at a time over a prepared metal dome and fasten down with pins. I will then rivet through those holes made by the pins to see the potential ways to produced a more finished look. I will update you as the project continues.
I received my very lovely package from Midway USA of fresh hog gut, fibrous gut, and collagen casting.

- The Collagen Casings have potential, they are very rigid and paper-like but still very thin
- the Fibrous Casing is very rigid but comes in very large sheets
- the hog gut has a horrid smell and comes in small tangled strands that have to be manually untangled

Some thoughts after the first hour of Soak:
1. Hog gut is very thing and see through, very flexible and seems easy to work with
2. Collagen remains semi stiff but the more it soaks the softer it gets, this product recommends either boiling in water prior to use or soaking for 24 hours or a combination there of so I will follow that recommendation prior to working with it
3. Fibrous is very stiff even after an hour of soaking, they recommend soaking for 24 hours changing water often as well as boiling if still remains stiff
I will stretch these one at a time over a prepared metal dome and fasten down with pins. I will then rivet through those holes made by the pins to see the potential ways to produced a more finished look. I will update you as the project continues.
Week 5 - Design and Production/J3
I have found myself merging the two classes a bit, while they both have very different motivations and ideals they have developed a common imagery and tone. I don't know if this is a good thing or a bag thing, I just know that I really enjoy making them. Design and Production has moved into a smaller scale modular work. They are simple organic forms that come together to form different pieces. J3 has gone about the same route with the theme of being a memorial piece, but has changed in scope. It is no longer a single pendant, but movable around the body to nearly any location that will fit it. I am really excited to see how both turn out and I really think both will become something I can stand behind and begin to form the foundation of my metals portfolio.
Jewelry 3-


All I have to say is I'm amazingly excited. I got a working prototype of the design. Thing is not the final design because in metal I can get more details working, but it is getting close. The die-form will be segmented like what you see in the bottom image and it will be hinged with small flaps closing each form and making each form it's own shape. The thin plastic represents the gut that will be used to contain and cover the different forms.
Design and Production
Steadily working along with making my wax forms. I have been moving away from the idea of containment to these small, simplified natural forms. I am thinking of making a collection of them in sterling silver and in an abs plastic that is modeled in rhino.


These are the successful ones, I will go back into the more failure-sided ones later and see if something can't be done with them. I really wish I had some images of them, my skill has increased some much from those first few it is crazy!
Jewelry 3-


All I have to say is I'm amazingly excited. I got a working prototype of the design. Thing is not the final design because in metal I can get more details working, but it is getting close. The die-form will be segmented like what you see in the bottom image and it will be hinged with small flaps closing each form and making each form it's own shape. The thin plastic represents the gut that will be used to contain and cover the different forms.
Design and Production
Steadily working along with making my wax forms. I have been moving away from the idea of containment to these small, simplified natural forms. I am thinking of making a collection of them in sterling silver and in an abs plastic that is modeled in rhino.


Tuesday, September 28, 2010
Week 3 and 4 Recap - Jewelry 3 and Design and Production
It's been a busy two weeks of designing!
Design and Production-


I finalized some of the designs I was going after. I found that some of my original ideas were overly complex and that I liked the aesthetic of the more simplistic forms, especially if they are being cast in the white metal.
 After some failed attempts in pink wax I talked to Dawn and found out that I was using the wrong type of wax this entire time. These shapes apparently were better suited for blue carving wax. Once I found this out, I was ready to go! The shapes started to come out in no time and in a few hours these babies were born:

They are still a bit rough but, I think with some more finishing they will be viable for what I need them to be used for. I hope to send them out shortly to be cast in the white metal. I want to try and get some more details into the next few samples I make so I can chose the ones I want to send out. I think a safe number to shoot for by the end of the week is around 15 or 20. I will go back and recreate the first few that I did now that my skill level has increased a bit. I also think that it may be possible with the new tools I picked up this weekend to go back in and define some of the shapes I already produced. I grabbed some wax burs to hollow out these shapes as well so I can make the internal containers as well as make them able to be cast.
 It has been a long drawn out discovery of the form this container will take over the past two weeks. I really want a design I can commit to, not something I just put together "because I liked it". I think that phrase needs to be banned completely from the studio forever. I was thinking about why jewelry is placed on the neck and the wrist ect, and I think that more thought needs to be placed on the placement of jewelry on the body. The assignment did not say "locket" or "necklace" yet we naturally go to those stand-by locations. I decided this does not fit the piece. I have designed a container that is broken into pieces and hinges open at the top and comes together to form a shape. These pieces are going to be held together by a dense forming of gut that is "riveted" to the skin and held in place by surgical tape and balled up silver. My gut should be here by early Friday to begin work and I hope to have a die-form to begin molding off of by that time or at least some of the materials I want to try to put through the gut. I was also wondering if gut and vellum can be layered in some way. The piece is small enough that I should have a lot of gut to work with.

 For the final piece, I have been thinking pretty hard about whether it will be different textures only on each little part of the form or whether it will be different metals, textures and have cold connected elements. I really want to take these as far as I have the skill to do so I was thinking that each element be a different metal depending on what it contains and that every piece of it has a different "identity" of my grandmother. I need to finalize this quick so I made a game plan of how this will commence from here on out that I hope to follow and produce the final work with a week to spare for clean up and final adjustments. That means its 100% important for the design and die to be completed this week so I made make all the forms next week and begin the soldering as well as shaping of the outer gut layer. The gut has been ordered from an online retailer, about 3 lbs was $7 with shipping which is quite decent. I ordered hog gut, fibrous casing, and collagen casing. From what I read of the research done already with the gut, the hog gut is stronger but, I want to try the other two types of casing to see if different results are achieved. I want to experiment with piercing the gut as well as drawing on it with prismacolors once it dries.
Design and Production-


I finalized some of the designs I was going after. I found that some of my original ideas were overly complex and that I liked the aesthetic of the more simplistic forms, especially if they are being cast in the white metal.


They are still a bit rough but, I think with some more finishing they will be viable for what I need them to be used for. I hope to send them out shortly to be cast in the white metal. I want to try and get some more details into the next few samples I make so I can chose the ones I want to send out. I think a safe number to shoot for by the end of the week is around 15 or 20. I will go back and recreate the first few that I did now that my skill level has increased a bit. I also think that it may be possible with the new tools I picked up this weekend to go back in and define some of the shapes I already produced. I grabbed some wax burs to hollow out these shapes as well so I can make the internal containers as well as make them able to be cast.
Jewelry 3
 It has been a long drawn out discovery of the form this container will take over the past two weeks. I really want a design I can commit to, not something I just put together "because I liked it". I think that phrase needs to be banned completely from the studio forever. I was thinking about why jewelry is placed on the neck and the wrist ect, and I think that more thought needs to be placed on the placement of jewelry on the body. The assignment did not say "locket" or "necklace" yet we naturally go to those stand-by locations. I decided this does not fit the piece. I have designed a container that is broken into pieces and hinges open at the top and comes together to form a shape. These pieces are going to be held together by a dense forming of gut that is "riveted" to the skin and held in place by surgical tape and balled up silver. My gut should be here by early Friday to begin work and I hope to have a die-form to begin molding off of by that time or at least some of the materials I want to try to put through the gut. I was also wondering if gut and vellum can be layered in some way. The piece is small enough that I should have a lot of gut to work with.
 Now, I don't know if this is my final shape. I want to make a few more maquettes before I commit. I want to divorce the shape from my design and production work a little more. I want it to be more personal. I have been working on some designs and sketches based off the image of the heart that I think are working well, so I will post the final image tomorrow or Wednesday and begin working on the die for Thursday.

 For the final piece, I have been thinking pretty hard about whether it will be different textures only on each little part of the form or whether it will be different metals, textures and have cold connected elements. I really want to take these as far as I have the skill to do so I was thinking that each element be a different metal depending on what it contains and that every piece of it has a different "identity" of my grandmother. I need to finalize this quick so I made a game plan of how this will commence from here on out that I hope to follow and produce the final work with a week to spare for clean up and final adjustments. That means its 100% important for the design and die to be completed this week so I made make all the forms next week and begin the soldering as well as shaping of the outer gut layer. The gut has been ordered from an online retailer, about 3 lbs was $7 with shipping which is quite decent. I ordered hog gut, fibrous casing, and collagen casing. From what I read of the research done already with the gut, the hog gut is stronger but, I want to try the other two types of casing to see if different results are achieved. I want to experiment with piercing the gut as well as drawing on it with prismacolors once it dries.
As for the surgical tape/adhesive, I am still researching types. I think I have one picked out, but I will finalize it this week and have it ordered. There are some really nice places online that sell surgical tapes and adhesives quite cheaply that are a better quality then found at a Rite-Aide or CVS.
Saturday, September 11, 2010
Week 2 - Design and Production - Concepts
So, I have been working on my concept sketches and I got my wax and tools today so I jumped in and just played with it to see what forms I could come up with. I was kinda fun and interesting to mess around with the wax, however, I don't know if it is going to accomplish what I am looking for it to accomplish.
I have decided in a way, not fully thought out yet and I don't think I need to be, that I want to produce a line that has these organic exteriors and private interiors. I have spent some time thinking up different shapes, I want the outside to be interesting without being overpowering. I keep drawing these semi organic shapes recently, and I looked back and I have been really actually drawing them for years. I think I can really use them to create a line because they are so interesting to me and flowing that they could be incorporated into any number of locations on the body. I started out with these elaborate hinged designs but, the practicality of doing this on a larger scale seemed unrealistic. I also wanted something I could do when I am not currently in school or when I don't have access to a studio. I want to be able to create this line and grow it without a total reliance on access to materials I do not have easy access to. This means out of house casting and cold connections.
I think it will be too much to take all the time to have two different shapes pieced together and assembled. I would much rather find a way so that when I produce it, it is totally made for me and all I have to do is clean it up and get it ready to be sent out. This is my ideal way to do things. I am not sure how far I can take that idea and still come out with the kinda of result I am looking for. I think in my last few sketches I really started to come up with something viable. They are these organic forms that have "hidden spaces" in openings. I want there to be "false openings" throughout so that one doesn't automatically just see the opening and I want it to be this private vessel inside of the organic floral shape.
Experimental Wax Form:


It is pretty rough I think, but it is also a first try at this process so I am going to keep working on it and bring it to class on Tuesday for some feedback. I think there are probably some things I am doing wrong with the wax, however, I find it a really fun process and I am really getting into the shaping and layering of the different forms.
 |
| The starting point |
 |
| Development of an Organic theme |
 |
| Illustration of Interchangeable Functions |
Experimental Wax Form:


It is pretty rough I think, but it is also a first try at this process so I am going to keep working on it and bring it to class on Tuesday for some feedback. I think there are probably some things I am doing wrong with the wax, however, I find it a really fun process and I am really getting into the shaping and layering of the different forms.
Friday, September 10, 2010
Week 2 - Jewelry 3/Design and Production - Die Forming Progress/Progress on the Line

We are working in hydraulic die-forming in Jewelry 3, and I have to say I LOVE IT! I know it sounds silly, but there is something so cool about taking a sheet of metal and plexi and turning into a "little machine" to pump out all these pieces you can puzzle together into designs and shapes. This semester has really inspired me so far to look deeper into my work and try to get something about me out. I want to do deeper then the surface work that you produce as a "student" and really delve into real issues. That being said, my forms have been prepped for sawing out and soldiering this weekend/early next week. I hope to get some real work done this weekend from the little bench I have set up at my house.


 I have been focusing on the shape I picked this week and taking it away from that "pillow-form" feel that is stereotypical of die-forming. I have so far tried chasing back into the surface which I think has a pretty nice result that I am looking for. This is really exciting stuff. It takes 1/3 of the time of chasing the entire thing by hand and it allows more time to focus on the design of the piece instead of the task of bumping that all out. So far so good on this, I have found 1 small spot in the point where there is a corner (you can probably see this in the image), but I am going to work around that and turn it into my vent hole. I have this idea of making these copper wire tendrils that come out of the hole almost like a star burst after its all soldered together to create a way to mask that vent hole after the soldering process is complete. I was thinking to keep it in the style of the rest of the piece I would take the torch and ball up the ends of the wire and maybe play with some inlay on the surfacing and add silver wire to the tendrils. I will have to sketch this out and see how it looks as a maquette. I think it has the aesthetic I am looking for on the outside of my pendant. This little form was a nice test and the imperfection really actually helped in creating the part I think the design needs. I don't know though it sounds sketchy when you write it out and I will have to see it actually done to see if it accomplishes what I am setting out for. As far as the actual piece goes, I think I am starting to get some sketches that work. I will post them up this weekend along with the other sketches of my design and production work.
Design and Production has gotten off to a semi-slow start. I feel that I am a bit limited in the fact that I want to be able to cast forms yet, have not taken casting yet. That's a bit disappointing; however, I want to try to make some wax models that might be able to be sent out for the final product. I was thinking about this project a lot this week and I have come up with some definitive ideas about what I am trying to accomplish, not so much visual representations of these ideas, but it all starts with a concept right? I want to create a piece that is about the internal person. Dawn Benedetto (http://www.torpedofactory.org/artists/benedetto_d.htm) talked tonight, at our welcome back party, about some work she did awhile ago that really helped me with some ideas. They were these rings that were plain on the outside but had this balls on the inside. They were all about the internal portion of the ring. When you put the ring on your finger you did not see the interior texture but you could feel it. This is what I want to do in an emotional sense with the lockets I want to create. I want these to be this simplistic forms, I am thinking of even echoing the shapes I have above in the pendant about my grandmother, and when you open them up they are totally transformed into something completely different. They are this internal space that is all your own. I personally think of it as a place to write wishes on a small piece of paper and contain in side. When you wear it, its like putting all your emotions out on display in this enclosed private way. I was thinking about hidden clasps or tension fit compartments, but I could even make it more simple. I could either cast or die form shapes and have them so the two halves tension fit together in some way. Really this needs more thought before I can really have an idea of what I want, but I think its getting there very quickly now.
In other news.....

I totally felt the need to order some of that paverpol "textile hardener" I have been hearing about. I want to play around with it a little bit and see if it works for what I am looking for in my jewelry 3 container. I also got some two part resin to try as well and I will whip out some maquettes this weekend and early next week to see if they get the desire effect with the dried flowers on the inside, if that is even the effect I want. I am really excited about this stuff, I have heard it can do some pretty amazing things so, it is probably worth the investment on this small little jar of it just to see what it can do!
Also, I am super jazzed that I should be receiving some metal and tools in the mail in the next few days. This is always so exciting for no reason, but new drill bits and scribes and yesss... A NEW SAWFRAME! I don't know little things like this excite me. Note to self, for the next order steel block and divider if I didn't order one already.
Subscribe to:
Posts (Atom)